A triumphant return to blogging

I’m going to be completely honest: I kind of forgot about my blog for three whole years.

But I’m back!

Things have changed since we last dined together (upon peaches in cassia syrup – yum!). The boyfriend I referenced so frequently in my posts is now the husband. Our daughter Jordana was born just over three months ago. I’m currently enrolled in graduate school and am earning my master’s in public health. Things are busy.

But I still have some time to cook!

I’m determined to keep this creative outlet going – if only because I recently got an email that the domain name just auto-renewed and I have another year of it.

sauteed peaches with wine-cassia syrup

Sauteed Peaches with Cassia-Vanilla Syrup

Sauteed Peaches with Cassia-Vanilla Syrup

Driving home to Atlanta from Charlotte, NC a few weeks ago, we stopped at a roadside produce stand in South Carolina. They offered fireworks and flats of fresh peaches at rock-bottom prices. I felt guilty purchasing peaches there, I told the farmer. “We live in Georgia!” I confessed. “It’s almost sacrilegious to buy them from you.”

“I hear that all the time,” he laughed. “But I promise, give these peaches a few days and they’ll be the best you’ve ever had.”

A few days later, his peaches were ripe and they were definitely tasty. I ate them plain and blended them into smoothies. But the best I’ve ever had? I don’t know about that. When you live in Georgia during the summer, peaches are kind of a big deal. We’re the Peach State, and for good reason. Farmers markets, farm stands, and even the local grocery stores are loaded with the fruit. And the offerings are really, really, really good.

The next week, Xavier and I went to Nicaragua and spent ten days traveling there. After we returned, a hectic week forced us to eat out more often than not. Finally, almost four weeks after the South Carolina farm stand, I restocked our kitchen with plump Georgia peaches purchased from Publix, of all places.

A few days later, I found Xavier finishing the last of our store-bought peaches. “That farmer was right,” he said. “That was the best peach I’ve ever had.”

(I couldn’t help laughing, because this is an ongoing thing: my boyfriend has a tendency to either lose track of time, or believe that perishable foods last forever. He is always surprised and crestfallen when he reaches into the fridge with his heart set on leftovers and finds that last month’s chicken parm has been eaten or tossed. It’s adorable).

“Those were gone weeks ago,” I told him. “That was a Georgia peach.”

Sorry, South Carolina.

A good Georgia peach doesn’t need to be dressed up, but should you find yourself with an abundance of them, this is a great way to use your stash. It’s an elegant dessert with classy looks that bely its simple preparation. If you can mix ingredients in a pot and let them simmer, you can make this dessert pretty easily. Furthermore, it is utterly delicious. The syrup boasts a complex sweetness from cassia, vanilla, wine, and rum. It complements and elevates the flavor of fresh peaches.

What is cassia, you may ask? I asked that question last weekend when I stumbled into Penzey’s and saw it on display. That’s a good question. If you buy cassia in a store, chances are it will look like little rusty pebbles. These “pebbles” are actually bits and pieces of the bark of an evergreen tree. If this sounds unfamiliar, it won’t for long: most of the cinnamon available in the United States is made from ground cassia bark. I chose to use this in my recipe because I had a new bag of it on hand, but it’s ideal because the pieces of bark have lots of surface area. A little goes a long way, flavor-wise.

If you’ve got a grill, feel free to omit the sauteeing step and grill your halved fruit. Also, cassia may be difficult to find – if you don’t have it, you could swap a whole cinnamon stick or 1/2 teaspoon of ground cinnamon. But keep in mind that powdered cinnamon will change the mouthfeel of the finished sauce. Same thing with the vanilla: you could use extract or paste if you don’t have a whole bean just lying around (and I wouldn’t, if not for eBay).

Sauteed peaches with cassia-vanilla syrup

Sauteed peaches with cassia-vanilla syrup

Sauteed Peaches with Wine-Cassia Syrup

  • Two large, ripe peaches, sliced in half with the pits and stems removed
  • 1/2 cup dry white wine
  • 1/4 cup plus one tablespoon sugar, divided
  • 1 vanilla bean, halved (or 1/2 teaspoon vanilla extract or paste)
  • 1 tablespoon rum
  • 1 tablespoon cassia (substitute 1 cinnamon stick, or 1/2 teaspoon ground cinammon)
  • 1 tablespoon honey
  • 3 tablespoons butter, cold, divided

Combine all of the ingredients except the butter in a small saucepan. Bring to a simmer over medium heat and simmer until thick and syrupy, about 10-15 minutes.

Meanwhile, in a medium saute pan over medium-high heat, melt one tablespoon of butter with one tablespoon of sugar. When hot, place the peaches in the pan with the cut side down. Saute without moving until the peaches caramelize, about five minutes.

When the syrup has thickened, off the heat and add two tablespoons of cold butter, stirring with a spatula until smooth. Strain to remove the vanilla and cassia. Place peaches on serving dishes, pour the sauce over them, and serve.

Serves four as dessert.

chocolate-coconut cupcakes with coconut-rum frosting

When I had the opportunity to sample Tropical Traditions‘ coconut oil as part of their press review program, I admittedly jumped to do so. I’ve been somewhat obsessed with trying different cooking oils lately. They are a wonderful – and simple – way to incorporate extra flavor into a dish.

Coconut oil is just so cool. When the jar arrived at my house, it had been outside in the Atlanta summer – the contents were completely liquid. But after a couple of hours chilling in 71-degree air conditioning, its contents solidified. The texture is different than anything I’ve seen before. It’s soft enough to easily scoop out, but there’s definitely a little resistance to it. It’s almost the texture of peanut butter, if peanut butter weren’t so rich. Since the oil reminded me of butter – soft at room temperature, liquid just barely above it – I wanted to see how it would hold up in frosting. Rum-coconut frosting was born. And with it, chocolate-coconut cupcakes that also incorporated the coconut oil with butter.

The results? Fantastic. The frosting is sweet and light, with amazing coconut flavor. And the cakes are rich but far from heavy. The coconut flavor shines.

They were thoroughly enjoyed.

coconut_chocolate_rum_cupcakes

Chocolate-Coconut Cupcakes (adapted from “Crazy about Cupcakes” by Krystina Castella)
2/3 cup boiling water
½ cup Dutch-process cocoa powder
4 ounces bittersweet chocolate, finely chopped
1 1/2 cups sugar
4 ounces butter (1 stick), at room temperature
4 tablespoons coconut oil
4 eggs, at room temperature
1 tablespoon vanilla extract
9 ounces flour
1 teaspoon baking soda
¼ teaspoon salt
1 cup yogurt

In a small bowl, stir together the boiling water and the cocoa powder. When the mixture becomes a smooth paste, add the bittersweet chocolate. Stir together until melted and smooth.

Using an electric mixer and a whisk attachment, cream together the sugar, butter, and coconut oil until fluffy. On medium speed, this should take five minutes or less.

Add the eggs one at a time, blending well between each addition and scraping the sides of the bowl as necessary. When all four are well-incorporated, add the vanilla and continue to blend.

Next, add half of the flour, the baking soda, and the salt. Mix on slow speed until uniform. Add the yogurt and stir well, then the rest of the flour. Finally, add the chocolate and mix on slow speed just until the batter is just blended.

Pour into cupcake liners, filling each about two-thirds, and bake at 350F for 20-25 minutes, or until a toothpick inserted in the middle comes out clean. This recipe will make about 24 medium cupcakes.

Coconut-Rum Buttercream Frosting
4 ounces butter (1 stick)
½ cup extra-virgin coconut oil
1/4 cup rum
¼ cup milk
1 pound powdered sugar, or to taste
Sweetened coconut flakes, to taste

Using an electric mixer and a whisk attachment, beat the butter and coconut oil until fluffy. Add the rum and milk in a couple of additions, blending between each. Adding a little at a time, incorporate the powdered sugar, whisking until the frosting is fluffy and somewhat firm. Frost cooled cupcakes, and dust with flakes of coconut.

Disclaimer: the coconut oil was provided as a press sample by Tropical Traditions.

empanadas de Xavier

baked_empanada_bite

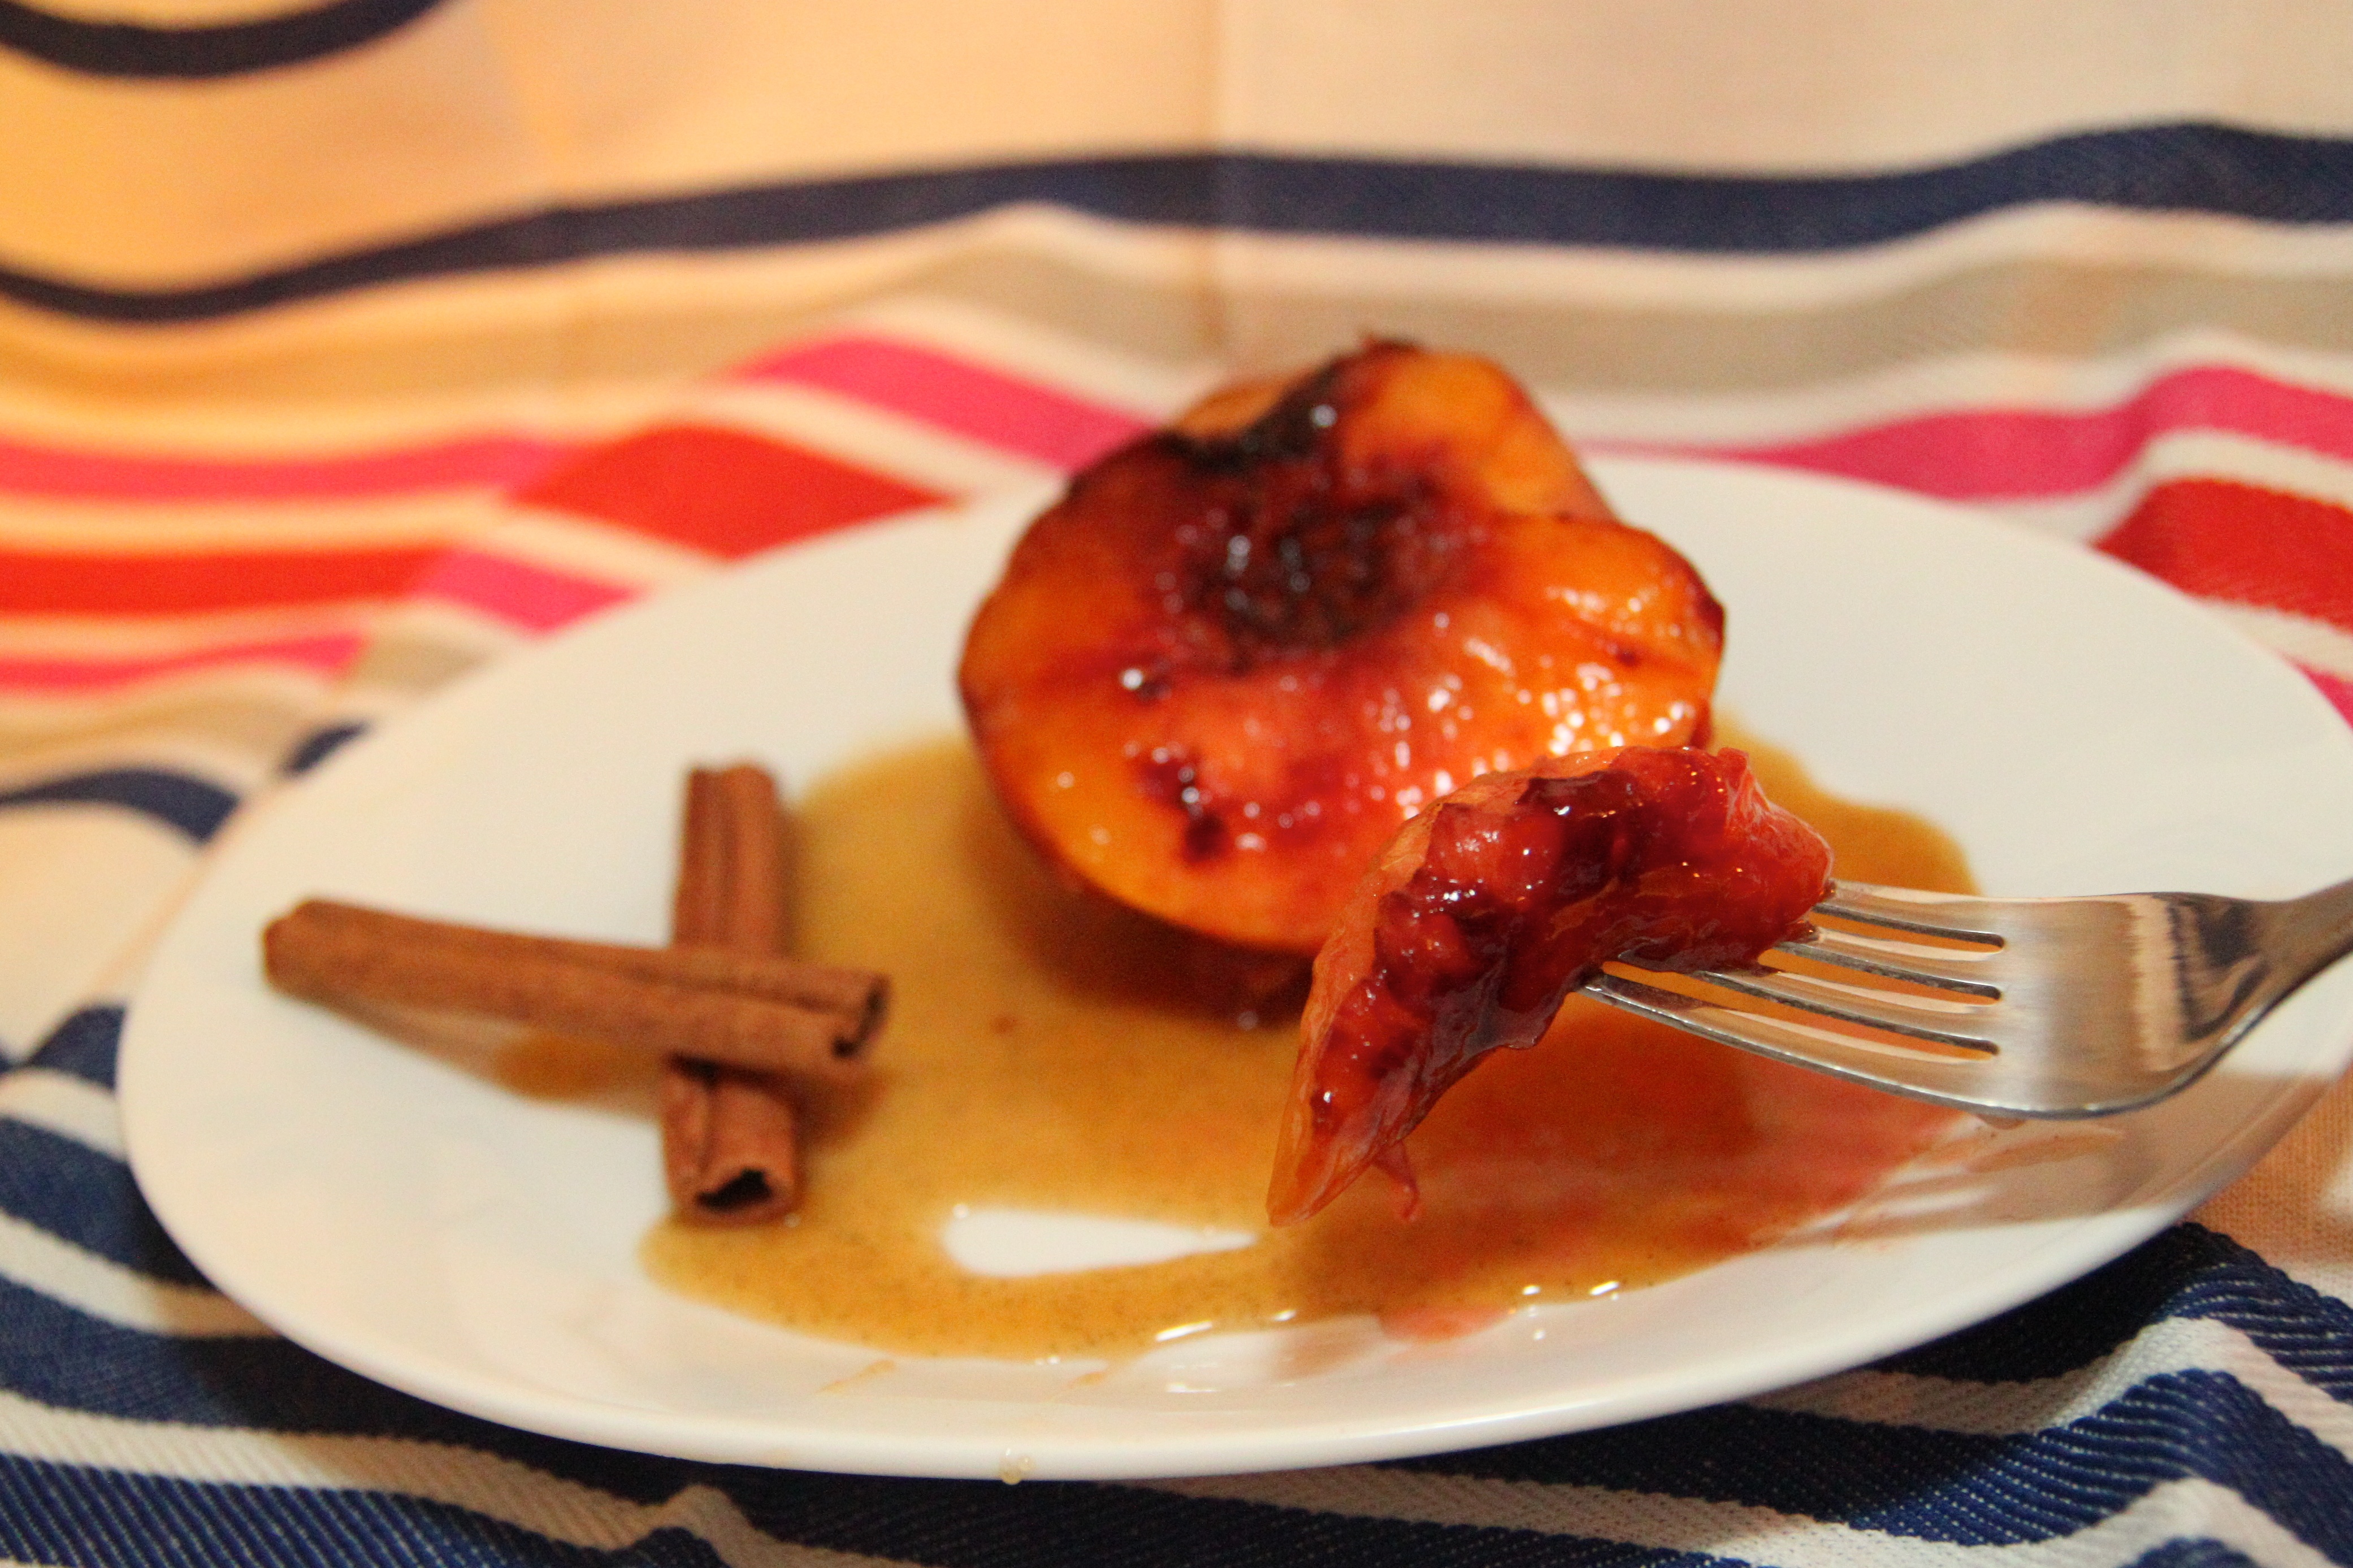
When people find out that my boyfriend is from South America, they often want to know if he has a sexy accent. Unfortunately, I’m not sure. When we first met, his voice definitely seemed different. But now that we’ve been together for a while, I don’t notice any accent. His voice is just his voice.

Since I’m not with the guy for his accent, I have had to find other benefits of dating a foreigner. That’s become Ecuadorian food. Xavier doesn’t cook much, but when he does, he knocks it out of the park. For one, he makes the best fried eggs I’ve ever had. And he’s been known to make tilapia with a lime-onion sauce, which is just awesome. But mostly, I have been trying to learn his comfort foods. I started with something that I loved eating in Ecuador: locro de papas, which is a potato soup loaded with avocado and cheese. (It is even better than it sounds!). Next came something that I’ve been promising Xavier for years. The boy adores empanadas, and I promised to make some for him. But for some reason, they eluded me.

I was a little nervous about tackling empanadas because I didn’t know where to begin. An empanada is not a universal thing. There are as many kinds as there are types of sandwiches! Seriously. You can make the pastry shell out of almost anything. Flour, corn, rice, or even green plaintains. The filling options are similarly endless. You can go sweet, by using fruit or fresh cheese. Or you can keep things savory with meat and olives. Or you can mix the two! A popular Ecuadorian empanada is stuffed with cheese, but dusted in sugar after it’s fried. Xavier had his heart set on meat empanadas. I couldn’t find any that looked good. Most incorporated things I don’t care for, such as olives.

Fortunately, my future sister-in-law saved the day. I sent her a Facebook message and she replied with a recipe for empanadas de carne, or meat. It was in Spanish, so I clarified a couple of things with Xavier so we could make these to the letter. The results were excellent. I can assure you, although they might be somewhat traditional in South America, olives are not missed.

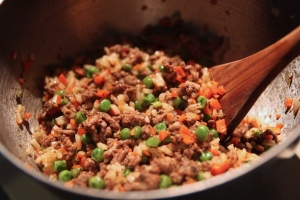
If you’ve never made empanadas before, there’s a little bit of an art to it, but it’s simple once you find a rhythm. Before you do anything, make sure you have some white rice on hand. You can quickly throw a little on the stove to simmer, or just have leftovers. Meanwhile, you’ll saute a mixture of ground beef, carrots, peas, and spices.

beef_peas_carrots

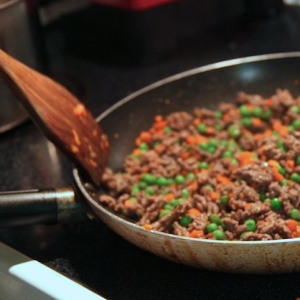
When the beef is browned, reserve the mixture in a separate bowl.

empanada_filling
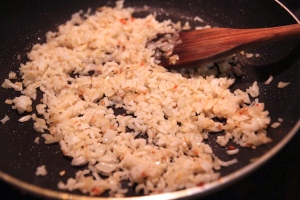
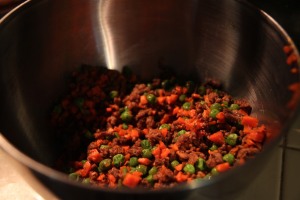
Next, you’ll saute garlic and onion together until they’re soft. You’ll add rice to this mixture, infusing those grains with tons of flavor.

garlic_onion_rice

Mix all of that together with the beef. There’s your filling.

empanada_filling

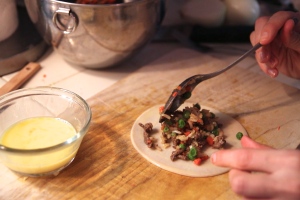
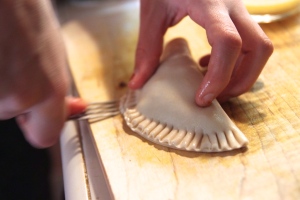
Okay, here’s where things get interesting: assembly time! The easiest way to do this is to set up a workstation. I use a cutting board. Have a sheet pan ready for your finished empanadas. I’m right-handed, so I use that hand for scooping filling, folding pastry, and crimping. My left is just support. Have a bowl of egg wash and a bowl of filling handy.

Working with one at a time, place an empanada shell on your workstation. Use your fingers or a pastry brush to paint the edges of the circle with egg wash. Moving quickly so the egg stays moist, place filling in the shell. I try to keep the meat towards the shell’s center, but it’s easier said than done.

empanada_fillingCarefully fold the pastry in half, keeping the filling away from the edges. It may take some practice, but once you get used to the motion, it’s easy to keep things tidy. Use a fork, if necessary, to poke and prod filling back inside.

empanada_folding
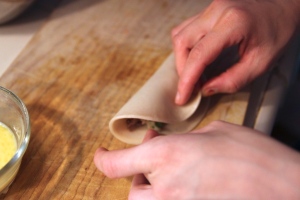
When things are folded nicely, use the ties of a fork to press the pastry’s edges together and crimp them decoratively. You could skip this step, but I think it does a great job of sealing the empanadas while making them pretty.

empanada_forking

When they’re ready to go, brush them lightly with the remaining egg wash. That will help them turn shiny and pretty in the oven. Yes, these are baked to keep them on the healthy side. Look how cute they are, ready for their tanning session!

empanadas_for_baking
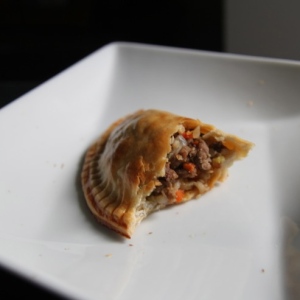
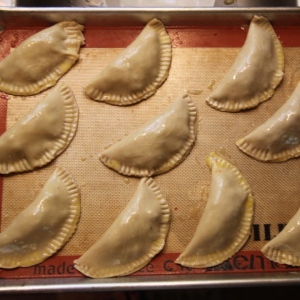
They will emerge about fifteen minutes later, golden brown and crunchy outside, with tender filling within.

empanadas_baked

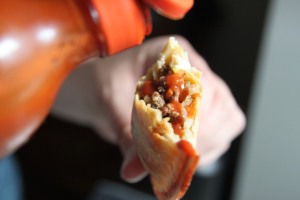
Bite one open. If you like things spicy, pour some hot sauce inside. Enjoy.

empanada_ajiYou could call these authentic Ecuadorian empanadas, because they came straight from Ecuador. But it’s important to remember that anywhere you try empanadas, they’ll be made a little differently. This is our version. I think the important question to ask is, are they good? Are they worth it? Well, I wouldn’t want to embarrass my Ecuadorian by disclosing how many of these he ate. Let’s just say yes, and yes.

Empanadas de Xavier
15 medium empanada shells (until I master these, use this Ecuadorian blogger’s recipe)
2 tablespoons vegetable oil
1 carrot, chopped finely
1/2 pound lean ground beef
1/2 teaspoon cumin
1/2 teaspoon dried oregano
1/2 teaspoon paprika
1 cup peas, shelled if fresh or frozen
1/2 onion, minced
2 cloves garlic, minced
1/2 cup white rice, cooked
1 egg, beaten

In a saute pan over medium heat, heat 1 tablespoon of vegetable oil until hot, then add the carrot. Saute until soft but not browned. Add the beef, salt, cumin, paprika, oregano, and salt to taste. Cook until browned, using a wooden spoon or spatula to separate the chunks as finely as possible. When browned, add the peas and allow the mixture to cook together. Remove and place in a bowl that has some extra room.

Now would be a good time to preheat your oven to 400F.

In the same pan, add the remaining oil, the onion, garlic, and salt to taste. Saute over medium-low heat until the ingredients almost melt into one another. Add the cooked rice to the pan and let it all cook together for a couple of minutes, stirring occasionally to mix things up. Add this onion-rice mixture to the bowl with the meat. Mix it together.

Take your empanada shells and fill them according to the photos. Working one at a time, moisten the edges of each shell with a little egg wash. Spoon a heaping tablespoon of filling into the middle. Fold the shells in half, using the tines of a fork to seal the edges.

baked_empanada_whole

skinny chiles rellenos

plated_chile_relleno

One of my favorite things to eat is a Tex-Mex chile relleno. Even in the tackiest of Americanized Mexican restaurants, you can count on a roasted poblano, filled with cheese or ground beef, fried to crispiness, then smothered in tomato sauce to ensure sogginess by the time it hits the table. Even the laziest of kitchens produce a fine, if bland, version of this dish. I thought I could do better.

Since I’ve been on a bit of a health kick lately, I wanted to make these at home, creating a version that would be both healthy and delicious. That meant no batter and no frying. It also meant that the pepper had to be stuffed with meat – cheese would be too heavy, and we all need protein. To boost the flavor, lean ground beef is sauteed with onion and cumin.

ground_beef_onions

The tomato sauce that ties everything together is enlivened with dried chiles. I use two guajillos, which packs some heat. Feel free to use just one if you’re sensitive to spice, or substitute something milder like puja chiles. They can be found at many Mexican grocery stores.

The recipe is complex because there are many steps, but it’s easy to multitask and execute. You’ll need your broiler to roast the poblanos and add a smoky flavor to the onions and garlic. If you’ve never rehydrated chiles before, now’s the time to start. You’ll toast the dried peppers in a hot skillet, then cover them with water. After they soak, they will be soft, pliant, flavorful, and ready to add that extra touch to your sauce.

Use a pan large enough to hold all the chiles, but compact enough that the sauce covers them during baking.

Poblanos all ready to be stuffed

Poblanos all ready to be stuffed

If you use lean ground beef (96/4) and little to no cheese, this recipe could be considered healthy. With the explosion of flavor from the sauce, I promise you won’t miss cheese-stuffed chiles.

Ready for the oven...

Ready for the oven…

Recipe: Skinny Chiles Rellenos

2 dried guajillo chiles
2 small onions, one peeled and quartered, the other diced
2 cloves garlic, peeled
6 poblano chiles
6 Roma tomatoes, halved and seeded (or 1 14.5-ounce can of fire-roasted tomatoes)
1 1/2 teaspoons cumin
1/2 teaspoon coriander
1/2 teaspoon dried oregano
1/2 teaspoon salt
1/2 pound lean ground beef
Monterey Jack cheese, grated, to taste
Cilantro to taste, for garnish

In a small skillet over high heat, toast the guajillo chiles, flipping frequently, until puffy. Add enough water to cover them and let the water come to a boil. When it boils, turn off the burner and allow the chiles to soak for 30 minutes. After 30 minutes, rinse and place in a blender.

Meanwhile, over a gas burner or under the broiler of your oven, roast the poblano chiles until blackened on each side. Place the chiles into a plastic bag and close tightly, allowing them to steam for 10 minutes.

Under your broiler, roast the tomatoes (if using whole ones), onion quarters, and garlic cloves until they blacken a little bit. Place the tomatoes, onion, and garlic into the blender with the chiles. Add 1 teaspoon of cumin, coriander, and oregano, half of the salt, and a splash of water. Blend on high until smooth, adding a little more water if necessary to get things moving around in there. Remove sauce to a small saucepan and bring to a simmer. Allow it to simmer for 10 minutes, until it thickens slightly.

Meanwhile, grab the poblanos. Carefully peel off the blistered skin, being careful to keep the flesh intact. Cut a slit down the side of each pepper and pull out the seeds. Arrange in a baking dish.

In a saute pan, cook the ground beef with the diced onion and the remaining cumin. Salt to taste if you’d like. Drain off the fat.

Carefully spoon the ground beef mixture into each poblano pepper, using your fingers to push the flesh back together after you’re done. Cover generously with tomato sauce, sprinkle with a little cheese if you’re using it, and bake at 400F for 15-20 minutes, or until the cheese on top melts and browns a little bit.

Garnish with cilantro and serve with rice and a salad on the side.

Serves two or three as an entree; six as an appetizer.

Chiles_Rellenos